|
|
LOVD ManualCurator handbookAs a curator, you are responsible for adding new variants, editing existing variants and checking and curating the ones submitted through the public area. Curators only have access to genes they have been authorized for. If you have no access to LOVD, please ask your manager to assign one or more genes to you.You can log in by pointing your browser to the config directory. Adding variantsAdding variants can be done manually or by importing a textfile. Manually adding variations is made easy by clicking on the 'Add' button in the menu. However, if you already have a list of variations, you can import a textfile into LOVD.Importing textfilesThe file should have these columns: Exonnumber · DNA allele 1 · Restriction site change · DNA allele 2 · RNA allele 1 · Protein change · Frequency · Phenotype · Reference · Detection template · Detection technique · DB Id · Remarks · (possible custom columns) · Patient Id · Non-public remarks · Times reported · Status.
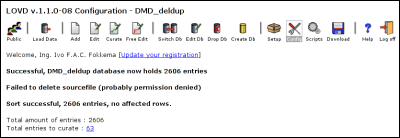
If no errors have occurred, LOVD will attempt to delete the text file to prevent it from loading the data twice by accident. However, this is very common to fail. This is because, usually, the webserver does not have the privileges to delete the files you have put online. If you receive the error "Failed to delete sourcefile", please delete the text file manually to prevent importing it twice by accident. After importing the new variants, LOVD will create a 'sort code' based on the contents of the DNA1, 'DNA allele 1' column. This is done by a algorithm that tries to interpret the sequence variant and creates a text string suitable for sorting. Thus you will get a message like "Sort successful, XXX entries, XXX affected rows". The number of affected (sort code updated) rows can be zero if, for instance, you imported a file previously downloaded from LOVD, as this file still contains the sort code. Manually adding variants
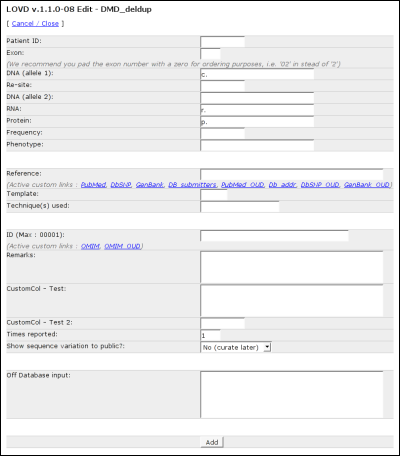
Patient ID: Fill in the lab's patient ID, as a reference. This field is not public. Exon: Fill in the exon number. Please use 02 or 06 as opposed to 2 or 6 if the gene in question contains 10 or more exons, since the exon number will also be used for ordering. DNA (allele 1): The allelic variant described at DNA level, allele 1. Re-site: A short description of any restriction site changed by the variant on allele 1. DNA (allele 2): The allelic variant described at DNA level, allele 2. This field is hidden when the gene is configured to hide the second allele. RNA: Fill in the RNA change of the first allele. Remember, this could be a change determined by diagnostic techniques, or a RNA change predicted from the change at DNA level. Protein: Fill in the change in protein produced by the first allele. Again, this could be a change determined by diagnostic techniques, or a protein change predicted from the change at DNA level. Frequency: In the case of a non-disease causing SNP, you can fill in the frequency with which it is found among normal controls. Phenotype: Fill in the disease, or 'normal' for no changed phenotype. Reference: Fill in the reference regarding the variant. You can choose from several standard custom links, or use the field as a free text field. Template: Fill in the template used for mutation detection (DNA, RNA, Protein). Technique(s) used: Fill in the detection technique(s) used. Unlike the public area, you are not restricted to the detection techniques configured in LOVD. ID: The Db-ID, used to identify the same variants between different patients within the database. Remarks: Fill in any other type of information that doesn't fit in other columns. Possible custom columns If custom columns are configured, fields for these columns will show up on the form. Times reported: Defaults to 1; allows you to fill in the amount of persons reported with this variant. Show sequence variation to public? Select whether or not this variant is publicly available. You have the option to curate the entry, but leave it marked. This will highlight the variant in red in the edit overview and also list the entry in the list of uncurated entries. Off Database input: This field is there for you to fill in any other data that should not be public. Finding variantsLOVD allows advanced searching methods enabling curators to quickly find sequence variations already available in the system. This searching method is integrated with both the 'Edit' and 'Curate' lists (see Editing and curating variants). By using the header above the result list, you can quickly and easily search through the list.Directly below every field's name there is a form field where you can type the restrictions that apply to the contents of this particular column. After typing in a search term, either press enter or click outside the field. Advanced searchingYou can use so-called 'Boolean expressions' in your search. This allows you to add more than one prerequisite for a column. The booleans that you can use are AND and NOT.ExamplesFor the 'DNA: Allele 1' column, type '>' in the search field. This will show only substitutions.For the 'Date added' column, type '2005' in the search field. This will show variants submitted or added to the system in 2005. Use '2005-11' to show entries added in November, 2005. For the 'Technique' column, type 'Southern' in the search field. This will show variants detected by Southern blot. Searching for 'NOT normal' in the phenotype field, will show only disease causing mutations. Searching for 'RT-PCR AND SSCA' in the technique field, will show only variants detected by both RT-PCR and SSCA, while searching for 'SSCA AND NOT RT-PCR' will show variants detected by SSCA but not by RT-PCR. Editing and curating variantsProbably most activity of a curator within LOVD is to curate new variants found in articles, sent by colleagues, or submitted by others. Within the menu there are two buttons allowing the curator to do this.You will see several form fields between the column names and the list of entries. These fields can be used to search the entries in the current database (See Finding variants). Sorting your results is made easy by clicking on the small blue arrows next to the column names. By default, the results are sorted by the DNA allele 1 column (using the sort code that LOVD generates from the contents of this column). This is indicated by a small red arrow. Below is an example of the Edit list, searching on mutations reported in 2005 by the Leiden laboratory, detected by Southern blot and causing a BMD phenotype.
Just like the Edit list, marked entries show up in red, while columns that are hidden for the public are indicated by a lighter background. Also searching and sorting works the same way. At the left of each entry in the 'Curate' list, you have one extra icon used to curate (make public) the entry directly. The alternative is to edit the entry and set 'Show sequence variation to public' to 'Yes' or 'Yes (but marked)'. The following buttons are located at the left of each entry. The 'Edit this entry' button opens a form similar to the 'Add new variant' form, allowing you to edit the variant. This form can also be used to curate this entry and provides more in-detail error messages than when using the Curate button.
The 'Delete this entry' button is used to remove the entry from the database. You will get a pop-up asking you to confirm your wish. The deleted entry will not be recoverable. Free Edit
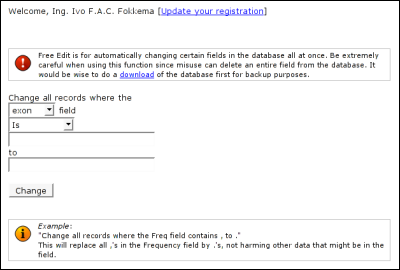
In the second field, select the type of search you wish to perform on the column. Is means a full match. The value you fill in must be the exact value of the field in the database. Contains means a partial match. The value you fill in must be located somewhere within the value of the field in the database. Starts with means a left partial match. The value you fill in must be located at the beginning of the value of the field in the database. Ends with means a right partial match. The value you fill in must be located at the end of the value of the field in the database. In the third field, fill in the search string, that you wish to have replaced by a different value. In the fourth field, fill in the replace string, that replaces the search string in matching database entries. Free Edit does not have a undo. So be extremely careful with what you do. If you make an error while using the form, you may loose important data from the selected column.
|


